Saturday, June 26, 2010

Sun Spots and More

These are my first images of the sun.  While getting the equipment set up, I was both excited and anxious.  With a family and other commitments, astrophotography is sometimes a challenge to fit in.  I've been very fortunate and have gotten a lot of support.

Equipment Summary:
  1. Orion StarSeeker 80mm Goto Refractor
  2. Dielectric Diagonal - prevents loss of light common in standard diagonals
  3. 3x Orion HighLight Barlow
  4. Orion StarShoot Planetary Imager
  5. PHD Planetary Software - used to control camera and takes pics 
  6. RegiStax 5.1 - used to process images
  7. Orion Solar Filter
Date/Time:  6/26/10  9:00am
Location:  Backyard - Pittsburgh, PA
Seeing:  Clear, Some Clouds
Weather:  Warm, Humid
Exposure:  64 ms x 1 image

Experience:  Good.  Taking pics of the sun is a unique experience.  Instead of the darkness, you're dealing brightness and heat.  Fortunately, I was near a tree to shade my laptop.

Notes:
  1. The images are okay.  You can see a few faint sun spots, but I was hoping they'd be more prominent.  I will try to process the images to get the sun spots to come out more clearly.
  2. If you double-click to enlarge images 1 - 3, it will be easier to pick out the sun spots.
  3. I'm not sure why the sun's color varies so much in these pics.  During my imaging session, I noticed at different times, the sun appeared brighter or darker on my laptop's screen.  Maybe there was some haze, or heat wavelets, or water vapor in the air.
Lessons Learned:
  1. After about 20 minutes, I got worried about keeping my telescope in the sun any longer.  They say the tube assembly can overheat in the hot sun.  So I hurried up, and finished with only a few pics.  In retrospect, I was fine.  In terms of temperature, it wasn't that hot at 9am.  I should have continued.

Next Time :
  1. Yes!  I was playing with image 1 in my PHD Planetary software and found a number of processing features to bring out more image details ... some hidden surprises too.  So stay posted.  My next post will be alternate images of the pics below.
  2. Also, for my next imaging session, I'm going to reduce the exposure time in the PHD Planetary software that controls my imager which should improve picture clarity.  Currently, I've been using the default of 64 milliseconds.  Also, next time, I'll try stacking the images too.

Clear skies!!!
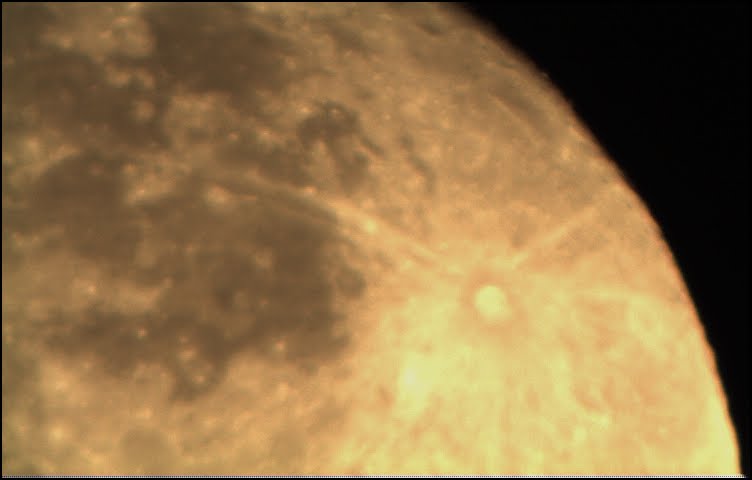
Look very carefully and you'll see a few sun spots.

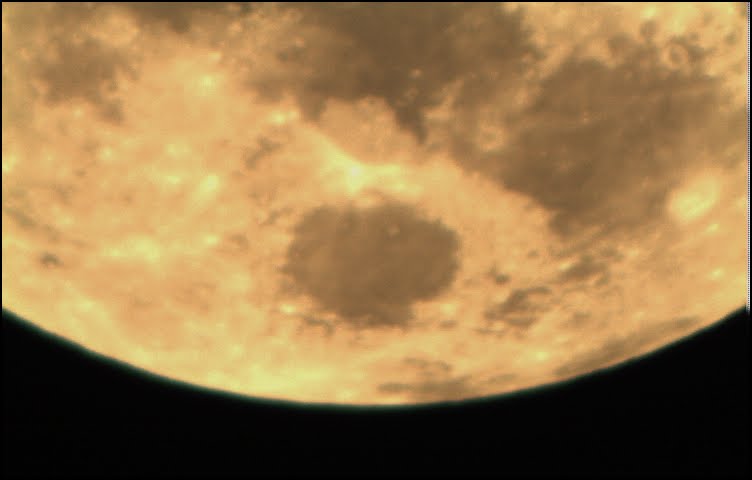
In this pic, one sun spot stands out in the upper right.

Can you find all the hidden sun spots?

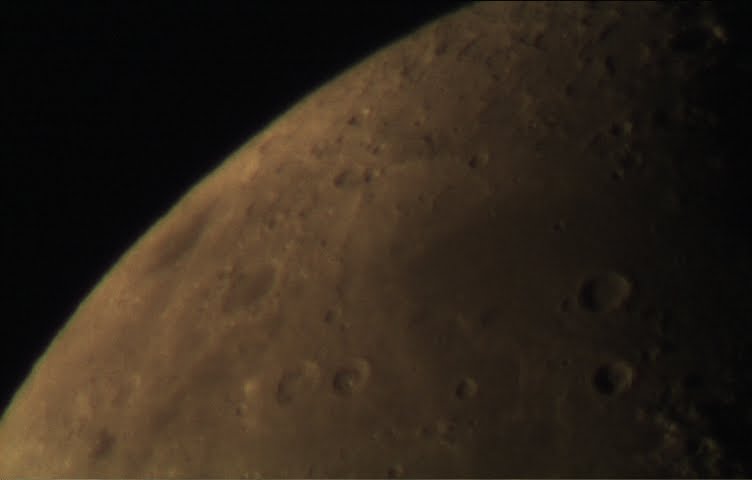
This pic looks overexposed.  I think the focus was a little off.

More Moon Astrophotography

Here are some more images of the moon.  I switched from a 3x barlow to a 2x shorty barlow.  Otherwise, all the other equipment was the same.

Equipment Summary:
  1. Orion StarSeeker 80mm Goto Refractor
  2. Dielectric Diagonal - prevents loss of light common in standard diagonals
  3. 2x Shorty Barlow
  4. Orion StarShoot Planetary Imager
  5. PHD Planetary Software - used to control camera and takes pics 
  6. RegiStax 5.1 - used to process images

Date/Time:  6/24/10  11:30pm
Location:  Backyard - Pittsburgh, PA
Seeing:  Clear
Weather:  Warm, Humid
Exposure:  64 ms x 1 image

Experience:  Very good.  I got a pretty late start, but at least there were no mosquitoes.  Still, I wore a long-sleeved shirt and sweats.

Notes:
  1. The moon is an easy subject to capture and offers a unique imaging opportunity every night.
  2. Patience is key.  Even though setup is a snap, it does take a little bit of time to move the equipment outside and connect everything together.
  3. I'm still learning about the GoTo features of my telescope.  Next time, I'm going to try the lunar tracking feature which may remove some of the blur in my pics.  I may also try my 5x barlow.
Lessons Learned:
  1. Take the shot!  Don't worry about getting the perfect image.

Next Time:
  1. The Sun (with a solar filter) ... guaranteed.  How can I guarantee that?  Easy, I already took the pics.

Clear skies!!!


Saturday, June 19, 2010

Moon Shots III

Okay, so I couldn't wait!  This is the final addendum to the "Moon Shots" post.

Here are all eight moon shots - bright and clear.  The wonderfully golden hues reflect the natural color of the moon.  I brightened the pics using RegiStax 5.1 and adjusting the Contrast value (e.g. from 100 to 250).  For each image, I had to test various Contrast values to achieve the right balance of light and dark.

To see more detail, click on any of these images to enlarge.


Moon Shots II

This is an addendum to my "Moon Shots" post.

Equipment:
  1. RegiStax 5.1 - used to process image.
Comments:  Aha!  I was able to brighten one of my images by opening it in RegiStax and increasing the contrast.  Here's the before and after.  I will work on the other images in the next day or so.

Before


After

Moon Shots

Below are my first shots of the moon.  But first, here's a recap of my outing:

Equipment Summary:
  1. Orion StarSeeker 80mm Goto Refractor
  2. Dielectric Diagonal - prevents loss of light common in standard diagonals
  3. 3x Orion HighLight Barlow
  4. Orion StarShoot Planetary Imager
  5. PHD Planetary Software - used to control camera and takes pics  
  6. RegiStax 5.1 - used to process images 

Date/Time:  6/18/10  9:00pm
Location:  Backyard - Pittsburgh, PA
Seeing:  Clear
Weather:  Warm, Humid
Exposure:  64 ms x 1 image

Experience:  Very good.  The scope, PHD software, and imager were pretty easy to set up and use.

Notes:
  1. Through a 26mm eyepiece, the entire moon was visible.  But when I replaced the eyepiece with the imager, I was only able to see a portion of the moon.  Next time, I may try an extension tube instead of a magnifying barlow.
  2. Try to lighten up these pics.  I actually have five more.  But they display darker on my PC and lighter on my laptop.  Strange!

Lessons Learned:
  1. Wear long sleeves/pants or apply bug spray.  The mosquitoes were attacking like fighter jets on Godzilla.

Next Time:
  1. Sun (with a solar filter), one of the planets, or the moon again.

Enjoy!


Saturday, April 17, 2010

My Telescope Equipment List

 I wanted to share my telescope equipment list and provide some insight into my setup choices.  I'm doing this for two reasons:  (1) This insight might help readers with their equipment selection process, and (2) the information will be relevant with future posts in which I describe my viewing and astrophotography experiences.  The following items were purchased over many years.

  1. Orion StarSeeker 80mm Goto Refractor - This telescope met my needs in five areas:  (1) priced right, (2) GoTo feature to automatically track to 4000 space objects, (3) quick setup (minutes), (4) two year warranty, and (5) reputable dealer.  Focal Length:  400mm.  Highest Useful Magnification:  160x.
  2. Orion StarShoot Planetary Imager and AutoGuider - It was either this one or the Orion StarShoot Solar System Color Imager III.  I checked with support at Orion Telecopes and they said that the Planetary Imager would provide better planetary images.  I won't use the the AutoGuider feature, since my scope's mount doesn't have an AutoGuider port and can't accept AutoGuider input.
  3. SkyGlow Broadband Light-Pollution Filter - Blocks out moderate light pollution for overall better viewing of deep space objects.
  4. UltraBlock Narrowband Light-Pollution Filter - Blocks out high light pollution for significantly better viewing of faint deep space objects.  For me, this is especially important given the modest capabilities of my scope.
  5. Barlow Lenses 1 of 2 - 2x Barlow and 2x Shorty-Plus Barlow.  Honestly, I can't remember why I bought both of them.
  6. Barlow Lenses 2 of 2 - 3x and 5x Orion HighLight Barlows.  These are premium barlows that I purchased specifically for improved planetary viewing and imaging.  Note:  A barlow or extension tube to provide extra focuser back travel is necessary for astrophotography with my particular scope.
  7. Eyepieces 1 of 2 - I have several Sirius Plossls (40, 26, 17, 12.5, 10, and 7.5mm) that I purchased years ago.  They're nice eyepieces for the price but the higher the magnification the smaller the eye holes.
  8. Eyepieces 2 of 2 - Recently, I purchased Orion Edge-On Planetary Telescope Eyepieces (14.5, 9, and 5mm) for the best possible planetary viewing with my scope.  They have much larger eye holes than the Sirius Plossls.
  9. Dielectric Diagonal - I have a 1.25" Dielectric Diagonal, providing 99% reflectivity which means more light to the eye and better views.  The standard diagonal that comes with most scopes suffers from some light loss.
  10. Soft Telescope Case - Holds the tube and tripod.
  11. Accessory Case - I have a medium-sized case so I can keep all my accessories handy on viewing nights.
  12. End Caps - My older eyepieces and barlows didn't come with plastic end caps.  I'm not sure they're really needed, but I figured it can't hurt.
  13. AC-to-DC Adapter - This is for the StarSeeker's GoTo tracking so I don't have to constantly replace batteries.
  14. Laptop - The Planetary Imager camera includes image capturing and processing software.  If you are looking to purchase an imaging camera (e.g. CCD, CMOS, etc.), make sure the accompanying software is 100% compatible with your laptop's operating system.  For example, some imaging software is compatible with Vista 32 bit operating systems but not with Vista 64 bit.  Buyer beware!
  15. Added 8/12/10:  1.25in. Orion Astrophotography Flip Mirror - Holds eyepiece and astro-camera at the same time, allowing you to easily flip between the two.
  16. Added 8/12/10:  Orion Min-EQ Tabletop Equatorial Telescope Mount.  To be used with the next item.
  17. Added 8/12/10:  Meade Coronado Personal Solar Telescope.  For detailed views of the sun (surface contours/ripples/filaments, solar flares/prominences, etc.) and solar astrophotography.  Highest magnification is 80x.
  18. Added 10/8/10:  Orion Apex 102mm Maksutov-Cassegrain Telescope.  I'll use it on my Min-EQ mount.  Maximum magnification is 204x.  I wanted to get the 127mm version, but the sales rep wasn't 100% sure if the weight would be too much for the Min-EQ mount.  Every mount has a weight rating meaning the maximum telescope weight the mount can handle before vibrations become excessive.  In addition, telescope tube length contributes to the vibration factor.  For example, given two telescope tubes of the same weight and two identical mounts, the longer telescope tube will vibrate more.
Well, that's my list.  You can certainly enjoy those starry nights with just a scope and a couple decent eyepieces.  It doesn't take much.  And more is not necessarily better.  The right equipment for you should be based on your viewing goals and budget.  In future posts, I plan to journal my viewing and imaging experiences in detail.  When I first started looking into telescopes and astrophotography, I couldn't find a running journal of real-life viewing and imaging experiences.  After years of off-and-on viewing, I've finally decided to create that journal here.  It will help me to learn and grow in this fascinating hobby.  And hopefully it will help to guide other budding astronomers as well.  Clear skies!!!